이전 글에서는 Django Channel 라이브러리와 적용 전/후의 구조 비교에 대해 알아보았었다.
이번 글에서는 Django Channel을 이용한 채팅 시스템 구현을 해보려고 한다.
(+추가 트러블슈팅) Channels Websocket UUID가 포함된 URL 수신하는 법 (링크)
📌 Django Channel 동작 Flow
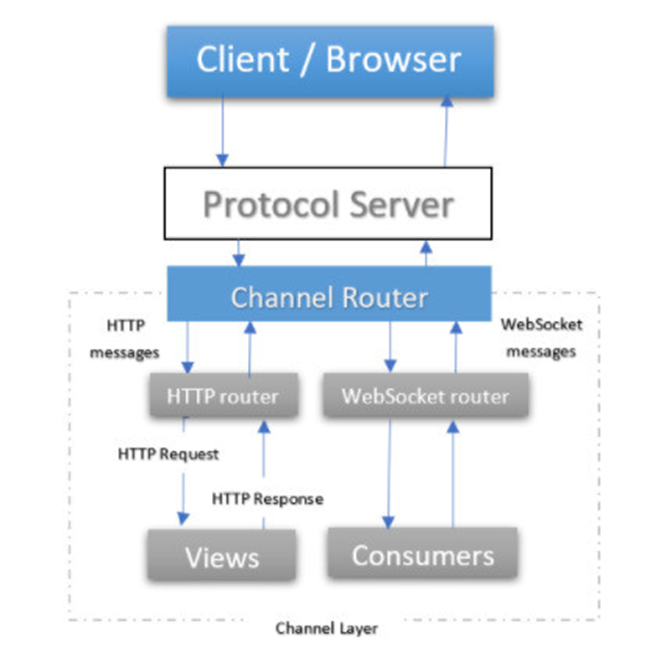
📌 Channel layer란?
channel layer는 쉽게 말해 의사소통 시스테므로, 많은 소비자들(client)들이 다른 client와 의사소통을 할 수 있게 해줌
- 개념 1. channel
- 각 메시지가 전달될 수 있는 우체통
- 각 channel은 이름을 가지며, 다른 channel에게 메시지 전송 가능 - 개념 2. group
- 연관된 channel들의 group
- group도 이름을 가지며, 그룹 이름을 가진 사용자는 누구나 그룹에 채널을 추가/삭제 가능 함
- group 이름을 가진 사용자는 모든 channel에 메시지 전송 가능
- 특정 group에 있는 channel들을 나열할 수는 없다. - consumer
- consumer 들은 기본적으로 채널 이름을 하나씩 가지고 이쓰며 channel layer를 통해 메시지 주고 받기 가능
- consumer 인스턴스가 group에 channel을 추가하여 같은 group끼리 서로 통신 가능하게 함
- 모든 consumer 인스턴스는 자동으로 유일한 channel name을 생성하기 때문에, 서로 channel layer를 통해 통신할 수 있다.
👉 1. 프로젝트 생성 및 Library Install
기본적으로 Django와 Docker 가 깔려져 있다는 전제하에 진행
$ pip install channels
$ pip install channels_redis
$ djaogn-admin startproject chatproject
$ cd chatproject
$ python mange.py startapp chat
👉 2. settings.py 작성
- channels 라이브러리와 chat app을 추가
- channel layers의 역할로, redis를 사용
- Django Channel 에서 In-MemoryChannelLayer도 지원 하지만 테스팅, 개발 단계에서만 사용할 것을 권장
INSTALLED_APPS = [
    'channels',
    'chat',
    ...
]
# Channels
ASGI_APPLICATION = 'chatproject.asgi.application'

# Channel layers => redis
CHANNEL_LAYERS = {
    'default': {
        'BACKEND': 'channels_redis.core.RedisChannelLayer',
        'CONFIG': {
            "hosts": [('127.0.0.1', 6379)],
        },
    },
}
👉 3. chatproject/urls.py & chat/urls.py 작성
목표 room name 을 입력하면 해당 채팅방이 생성 되게 하는 것이 목표이다.
# chatproject/urls.py
from django.contrib import admin
from django.urls import path, include

urlpatterns = [
    path('chat/', include('chat.urls')),
    path('admin/', admin.site.urls),
]

# chat/urls.py
from django.urls import path
from . import views

urlpatterns = [
    path('', views.index, name='index'),
    path('<str:room_name>/', views.room, name='room'),
]
👉 4. chat/views.py 작성
해당 url에 맞는 함수들 생성
from django.shortcuts import render

def index(request):
    return render(request, 'chat/index.html', {})

def room(request, room_name):
    return render(request, 'chat/room.html', {
        'room_name': room_name
    })
👉 5. chatproject/asgi.py 작성
- 기존 http만 받던 구조에서 http 프로토콜, websocket 프로토콜 두개를 받을 수 있도록 ProtocolTypeRouter로 감싸줌
- ws:// , ws:/// 형식의 웹 소켓 연결 수신시 AuthMiddlewareStack에서 처리
- AuthMiddlewareStack은 현재 인증된 유저를 참조하여 연결의 scope (정보) 를 채움
import os

from channels.auth import AuthMiddlewareStack
from channels.routing import ProtocolTypeRouter, URLRouter
from django.core.asgi import get_asgi_application
import chat.routing

os.environ.setdefault("DJANGO_SETTINGS_MODULE", "mysite.settings")

application = ProtocolTypeRouter({
  "http": get_asgi_application(),
  "websocket": AuthMiddlewareStack(
        URLRouter(
            chat.routing.websocket_urlpatterns
        )
    ),
})
👉 6. chat/routing.py 작성
- chat/urls.py 에서 작성했던, websocket에 대한 최종 routing
- consumer의 인스턴스를 생성하기 위해 as_asgi() 메서드 사용
- 내부 Router가 미들웨어(AuthMiddlewareStack)에 감싸져 있을 경우 에러가 날 수 있어 re_path() 함수를 path() 대신 사용
from django.urls import re_path
from . import consumers

websocket_urlpatterns = [
    re_path(r'ws/chat/(?P<room_name>\w+)/$', consumers.ChatConsumer.as_asgi()),
]
👉 7. chat/consumers.py 작성
- connect()
- 연결시 channel layer의 group에 해당 channel을 추가한다. - disconnect()
- 연결 해제시 channel layer의 group에서 channel을 삭제한다. - receive()
- Web Socket으로부터 받은 메시지를 channel layer의 group 내 모든 channel에게 보냄 - chat_message()
- channel layer의 group으로부터 받은 메시지를 클라이언트로 전달
import json
from asgiref.sync import async_to_sync
from channels.generic.websocket import WebsocketConsumer

class ChatConsumer(WebsocketConsumer):
    def connect(self):
        self.room_name = self.scope['url_route']['kwargs']['room_name']
        self.room_group_name = 'chat_%s' % self.room_name

        # Join room group
        async_to_sync(self.channel_layer.group_add)(
            self.room_group_name,
            self.channel_name
        )

        self.accept()

    def disconnect(self, close_code):
        # Leave room group
        async_to_sync(self.channel_layer.group_discard)(
            self.room_group_name,
            self.channel_name
        )

    # Receive message from WebSocket
    def receive(self, text_data):
        text_data_json = json.loads(text_data)
        message = text_data_json['message']

        # Send message to room group
        async_to_sync(self.channel_layer.group_send)(
            self.room_group_name,
            {
                'type': 'chat_message',
                'message': message
            }
        )

    # Receive message from room group
    def chat_message(self, event):
        message = event['message']

        # Send message to WebSocket
        self.send(text_data=json.dumps({
            'message': message
        }))
👉 8. Redis 실행
Docker의 Redis 컨테이너를 backing store로 사용하는 channel layer 생성
$ docker run -p 6379:6379 -d redis:5
👉 9. FE 작성 (index.html, room.html)
📁 templates/chat/index.html
<!DOCTYPE html>
<html>
<head>
    <meta charset="utf-8"/>
    <title>Chat Rooms</title>
</head>
<body>
    What chat room would you like to enter?<br>
    <input id="room-name-input" type="text" size="100"><br>
    <input id="room-name-submit" type="button" value="Enter">

    <script>
        document.querySelector('#room-name-input').focus();
        document.querySelector('#room-name-input').onkeyup = function(e) {
            if (e.keyCode === 13) {  // enter, return
                document.querySelector('#room-name-submit').click();
            }
        };

        document.querySelector('#room-name-submit').onclick = function(e) {
            var roomName = document.querySelector('#room-name-input').value;
            window.location.pathname = '/chat/' + roomName + '/';
        };
    </script>
</body>
</html>
📁 templates/chat/room.html
<!DOCTYPE html>
<html>
<head>
    <meta charset="utf-8"/>
    <title>Chat Room</title>
</head>
<body>
    <textarea id="chat-log" cols="100" rows="20"></textarea><br>
    <input id="chat-message-input" type="text" size="100"><br>
    <input id="chat-message-submit" type="button" value="Send">
    {{ room_name|json_script:"room-name" }}
    <script>
        const roomName = JSON.parse(document.getElementById('room-name').textContent);

        const chatSocket = new WebSocket(
            'ws://'
            + window.location.host
            + '/ws/chat/'
            + roomName
            + '/'
        );

        chatSocket.onmessage = function(e) {
            const data = JSON.parse(e.data);
            document.querySelector('#chat-log').value += (data.message + '\n');
        };

        chatSocket.onclose = function(e) {
            console.error('Chat socket closed unexpectedly');
        };

        document.querySelector('#chat-message-input').focus();
        document.querySelector('#chat-message-input').onkeyup = function(e) {
            if (e.keyCode === 13) {  // enter, return
                document.querySelector('#chat-message-submit').click();
            }
        };

        document.querySelector('#chat-message-submit').onclick = function(e) {
            const messageInputDom = document.querySelector('#chat-message-input');
            const message = messageInputDom.value;
            chatSocket.send(JSON.stringify({
                'message': message
            }));
            messageInputDom.value = '';
        };
    </script>
</body>
</html>
👉 10. 테스팅
- Django 서버 실행
$ python manage.py makemigrations
$ python manage.py runserver
- http://127.0.0.1:8000/chat/ 접속 후 방 제목 입력

- 클라이언트 두 개로 정상적으로 통신이 작동되는 것 확인

👉 11. 참고문헌
- https://caniro.tistory.com/252
- https://ssungkang.tistory.com/entry/Django-Channels-%EB%B9%84%EB%8F%99%EA%B8%B0%EC%A0%81-%EC%B1%84%ED%8C%85-%EA%B5%AC%ED%98%84%ED%95%98%EA%B8%B0-WebSocket-2#:~:text=Channel%20layer%20%EB%9E%80%3F,%ED%95%A9%EB%8B%88%EB%8B%A4.%20channel%20%EA%B3%BC%20group%20%EC%9E%85%EB%8B%88%EB%8B%A4.
'Python > Django' 카테고리의 다른 글
| [Django] 채팅 시스템 (3) UUID가 포함된 URL을 Channels Websocket이 수신하는 법 (0) | 2022.07.22 |
|---|---|
| [Django] Timezone 한국 시간으로 설정하기 (0) | 2022.07.17 |
| [Django] 채팅 시스템 (1) Channels 적용 전/후 구조 비교 (0) | 2022.07.15 |
| [Django, MySQL] Django MySQL 셋팅하기 (0) | 2022.07.13 |
| [Django, AWS] EC2 에서 Nginx + Gunicorn + Django 배포하기 (0) | 2022.07.12 |